In order to edit this wiki, you must register and verify your account.

Serfrosts Cemu Setup Guide: Difference between revisions

From Cemu Wiki
Jump to:navigation Jump to:search
Line 521: Line 521:
| <center>'''DELETE YOUR OLD PACKS FIRST'''</center>
| <center>'''DELETE YOUR OLD PACKS FIRST'''</center>
|-  
|-  
| <br>'''GraphicPacks Available for Download:''' '''[https://slashiee.github.io/cemu_graphic_packs/ Click Here]'''<br><br>
| <br>'''GraphicPacks Download:''' '''[https://slashiee.github.io/cemu_graphic_packs/ Click Here]'''<br><br>
|-
|-
| <center>'''DELETE YOUR OLD PACKS FIRST'''</center>
| <center>'''DELETE YOUR OLD PACKS FIRST'''</center>

Revision as of 05:11, 1 November 2018


Wanting to add mods to Breath of the Wild on CEMU? Click Here


Welcome!

Guess you're wanting to try Cemu? Please make use of the Table of Contents and do not skip through information!
Consider reading all of the sections to get a good understanding. If you're able to do that, any game should be
of little difficulty to run, as long as it's rated well on the Compatibility List linked below. Additionally, if the game
does not run as desired, please review the game's designated page on the Compatibility List to see why.

[ Official CEMU Compatibility List ]

Breath of the Wild exclusive sections are labeled as such, so take note.


Written & Managed by Serfrost - Special Thanks to Darkemaster and the CEMU Community

Appreciate this guide? Consider donating, as I don't have an income; anything would mean a lot!

=== PayPal Donation Page ===


  Last Edit: 10.31.2018
  CEMU Version 1.14.0c
  AMD GPU Users - Current version /or/ 1.12.0d
  Cemuhook v0.5.7.0 or newer.
  AMD GPU Users - Current version /or/ 0.5.6.4 for 1.12.0d
  BotW Update v1.5.0 (v208) + DLC is recommended.
  Please note that the game must have Update Data applied to boot at all.


Cemu's Recommended Settings

Prerequisites


  • Extract CEMU to a Proper Destination
CEMU Webpage
  • Microsoft Visual C++ 2017 X64 Redistributable
Click Here
  • Cemuhook
Click Here

Cemu's Properties Settings

Please see CEMU Setup to view how to properly configure both Cemu's EXE and any shortcuts to the emulator.

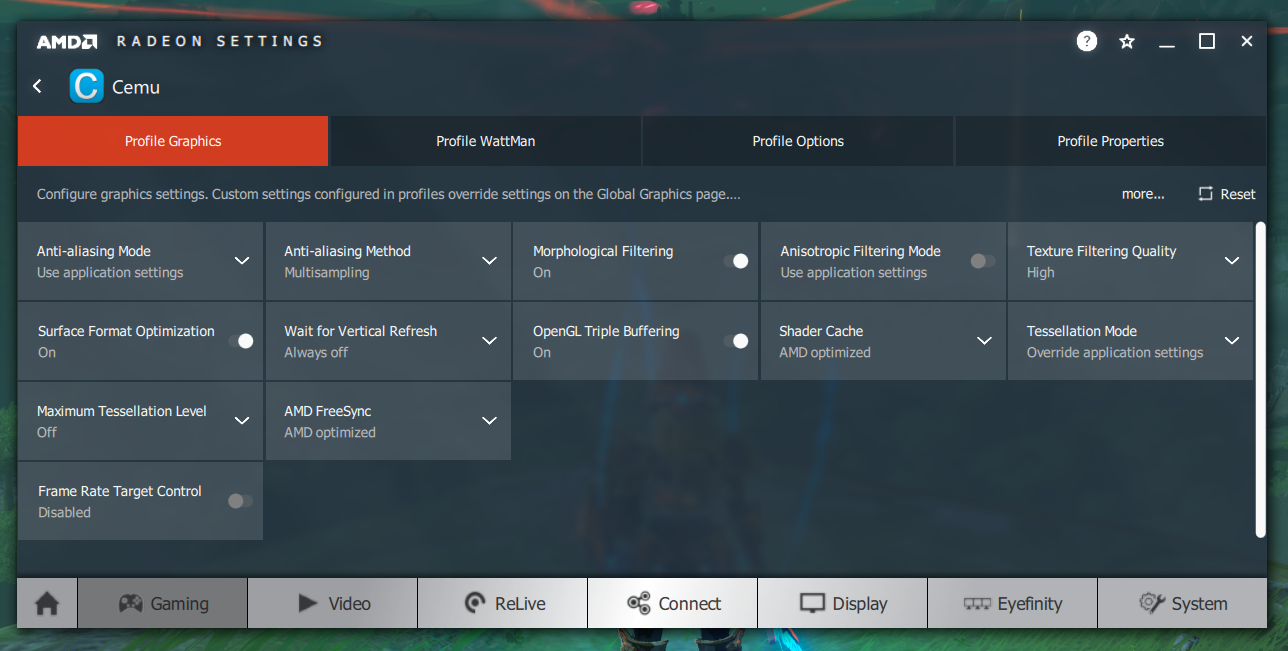
GPU Settings

Recommended settings for your GPU Driver can be found here:
iGPU (Intel Integrated Graphics) Users who experience problems can try this: (Keep in mind this will likely cause other games to fail to boot that would previously.)

Users should create a CEMU shortcut, edit its properties, adding -nolegacy to their Target: [ See Here ]

If the issue persists, it's one of the following: update your iGPU driver, the game will not work for that specific iGPU, or your iGPU is too old to support OpenGL 4.5

Options → General Settings

General Tab

Interface:
Language:
  • Recommended: User Preference
  • Translates CEMU's UI to the users' preferred language.
Discord Presence:
  • Enables Discord Rich Presence when users view your status; shows what Wii U game you're playing, etc.
Fullscreen Menu Bar:
  • Enables the menu bar for options while in Fullscreen.
MLC Path:
  • Optionally change where installed Game Updates, DLC, Save Files, Mods, and Wii U NAND (Online) information is stored.
Default location is X:\*\Cemu Folder\mlc01\
Game Paths:
  • Where your games are stored. You can have multiple paths.

Graphics Tab

Misc:
VSync:
  • Recommended: Enabled
Should only be turned off if you're using Gsync or Freesync.
Full sync at GX2DrawDone:
  • Recommended: Enabled
Syncs the CPU and GPU, much like the Wii U. Will help prevent games from breaking.
Use Separable Shaders:
  • Recommended: Enabled
Last I heard, this option will be removed soon. Mainly for testing purposes.
Disable Precompiled Shaders:
  • Recommended: Disabled
Enable this if you use an NVIDIA GPU and CEMU acts as if you do not have a shaderCache.
(Intermittent pausing & stuttering even after you waited for the Transferrable Cache to compile.)
Upscale Filter:
  • Recommended: Bilinear
Test both to see which scales better for you in contrast to any performance hit.
Fullscreen Scaling:
  • Recommended: Keep Aspect Ratio
"Stretch" may be good for uncommon display resolutions.

Audio Tab

General:
API:
  • Recommended: XAudio2
You can test the alternative option if you desire.
Latency:
  • Recommended: 48ms
If you notice crackling audio in games, you should try increasing the latency until it stops.
TV:
Device:
  • Select which audio device you wish to use for Audio Output.
Channels:
  • Stereo is the only option available.
Volume:
  • Recommended: 90% ~ Max
It was said long ago that maxing the volume can cause audio distortion.

Menu Bar (Options / CPU / Debug) Settings

Options Menu

GX2SetGPUFence skip (HACK):
  • Recommended: Disabled
Meant only for BotW, additionally FPS++ and Static FPS++ will handle this without you touching it.
GPU Buffer Cache Accuracy:
  • Recommended: Low
Few games require High, change it on a per-game basis, always keep it Low otherwise.
You may set this with a GameProfile by placing the following line under [Graphics] : GPUBufferCacheAccuracy = # ; 2=Low, 1=Mid, 0=High
Experimental:
Use RDTSC:
  • Recommended: Enabled
Enables Cemu's more accurate CPU & Audio timing mode.

CPU Menu

Mode: (Dependent on your CPU type.)
Single Core:
  • Recommended for most games, the other choices will likely freeze the game.
Additionally, recommended for Dual Core CPU owners.
Dual Core:
  • On few supported games: 4-Core+ CPUs can see a performance gain.
Breath of the Wild is supported.
Triple Core:
  • On few supported games: 6-Core+ CPUs can see a performance gain.
Quad Core CPUs can see better FPS Stability, but 2~8 FPS less on average; possibly increased core temperatures.
Breath of the Wild is supported.
Timer:
  • Required: Host Based
Cycle Based is for debugging games, testing crashes and freezes. Try this if you freeze in a game, etc.
Affinity:
  • Test each option in-game to see what benefits your performance the most, stick with it for all games.

Debug

(These options will only be enabled with Cemuhook added to Cemu)

Custom Timer:
  • Recommended: RDTSC or QPC
MM Timer Accuracy:
  • Recommended: 1ms or Highest
(Seeing a performance difference is unlikely, but you can test in-game.)

CEMU's Requirements?

CPU

We recommend INTEL or AMD Ryzen series Processors. Generally speaking for Breath of the Wild and almost any CPU, you want to be over 4.0GHz.

Pre-Ryzen AMD CPUs are so-so, but with the new Dual Core or Triple Core Recompiler options, performance should be better in any applicable games.

You can check out Darkemaster's AMD FX Compatibility Video list for Cemu 1.12.0 [Here]

 Single Thread IPC and Overclocking are the most important factors for how well CEMU will perform on your PC! 

This list ranks CPUs for Single Thread IPC:

https://www.cpubenchmark.net/singleThread.html

I wouldn't recommend going under a score of ( 2,000 ) if you plan to play Breath of the Wild at 30FPS (Native Wii U Framerate) 

Experimental Multi-Core Recompiler

This experimental setting allows extra cores to be utilized for PPC CPU emulation instead of 1, however not many games actually utilize multiple PPC cores and currently causes stability issues/crashes or offers no benefit for most titles.

Dual Core Recompiler requires a minimum of 4 cores+threads available and is not recommended for Dual Core (2 cores+threads) CPUs; system instability.

Triple Core Recompiler requires a minimum of 6 cores+threads available and is not practical to use on pre-8th generation i5 and pre-6th generation i7 Intel CPUs.

RAM

We recommend at least 8GB RAM for most games, but preferably 16GB+.

If you run out of RAM and have a very slow SATA HDD, you are either likely to stutter relentlessly in-game or you may possibly have Crashes.

Solid State Drives (SSD) are a boon to users with lesser amounts of RAM, as your PC will push data to the PageFile on your SSD if you set it to do so. They are much faster than SATA drives.

PageFile: A pagefile (virtual memory) is essential to have in order to avoid crashing when running out of available RAM. Instead of crashing immediately when exceeding RAM limit, you may experience lower performance when a pagefile is used and may also experience additional in-game stutter when swapping. One way to see if one is using a pagefile while using Cemu is to see their "total commit size" in task manager and pay attention to if the number shown being used exceeds the amount of physical RAM installed within your PC, as pagefile usage is typically not shown under RAM usage statistics.

Your GPU vendor can also play a role in what your RAM usage will be in Cemu and will determine how essential a pagefile is, or how often it will be used, if at all.

It is recommended to have a pagefile on an SSD or the fastest drive available, and to leave pagefile size as System managed size. Altering your pagefile size may cause your PC to become unstable, resulting in crashes of your entire system.

Alternatively, some users suggest to have a custom size of .5 times your physical RAM as Initial size(MB) and 1.5 times your physical RAM as Maximum size(MB). Research is highly recommended before changing your pagefile settings.

GPU

NVIDIA GPUs are recommended; they can take some strain off of your CPU and have better performance through threaded optimization/OGL multi-threading when under heavy CPU workloads.

AMD GPUs perform great for all but the heaviest of games, they are negatively influenced by CPU bottlenecks. This may all change with Vulkan implementation in the future.

Intel Integrated Graphics (iGPUs) are not officially supported but have decent compatibility.

A comprehensive list of all known current GPU-vendor specific bugs and available workarounds in Cemu can be found here - GPU Compatibility List

GPU power and available VRAM is not very important unless you want to increase your game's internal resolution or reaching higher FPS limitiations. If you lose noticeable performance when playing at a higher resolution it means you are GPU/VRAM limited and your graphics card/VRAM amount is not sufficient to maintain said resolution without a performance loss. It is possible to be GPU/VRAM limited at native resolution with weaker/1GB-2GB GPUs and iGPUs, to determine if you are when under these conditions lower resolution and see if performance improves.

[BotW] For 4k @ 30FPS or 1440p (2k) @ 60FPS

It is recommended to use a modern GPU with at minimum 4GB VRAM.
Reaching 60FPS is almost entirely determined by your CPU.
Most users will not obtain 60FPS even with optimal settings.

[Any Game] Standard Gameplay at 720p / 1080p Native Wii U Resolution

We recommend anything in range of a NVIDIA GTX 600 or AMD HD 7000 series or above.

Dumping Wii U Games for use with CEMU

A tutorial for dumping Games, Updates, and DLC is located here: Click Here

After dumping your games we suggest converting them to Loadiine (RPX) format with UWizard. Title Keys required!

We do not support any other means of obtaining copyrighted content!

Using CEMU's Online Mode

This requires Cemu 1.11.1 or newer. Currently supports Smash Bros, Mario Kart 8, Splatoon, Super Mario Maker, and others.

To connect online you'll require your Wii U with Homebrew, and a way to dump files from your Wii U NAND onto your SD Card.

Follow this guide from Flocker Click Here

Local Co-op Online (Parsec)

Check out this thread and video to get started; decent internet connection recommended. [Click Here]

Downloading & Updating CEMU

Setup

[ Click here to return to CEMU's Recommended Settings ] (Top)

Download Cemu from http://cemu.info/ and extract to a folder in one of these locations:

  Recommended: SSD Storage
  a. ) Desktop
  b. ) Your C:\ Drive Root
  c. ) An alternative internal storage drive.
  d. ) An external storage device.
  Note: Not recommended unless USB 3.0 or 3.1; will still be slow, probably.

Do NOT put it in your Program Files or other system directories, Cemu will lack file permissions!**

  • Open the folder, right-click on Cemu.exe -> Properties -> Compatibility
  • If available, enable the option resembling:
Change high DPI settings
Override high DPI scaling behavior. Scaling performed by: Application
  • If available, enable Disable fullscreen optimizations
  • Lastly, enable Run this program as an administrator (This is to ensure you have full permissions.)
  • Apply, then click OK.

Updating

Updating Cemu is simple, just download it normally and then replace Cemu.exe within its folder.

  • If you manually created any gameProfiles or made edits, it might be a good idea to keep a backup of this folder; your decision.
  • It may also be a good idea to delete your Precompiled shaderCache when updating Cemu.
  • Deleting your Precompiled shaderCache will require you to wait for a longer period when launching a game for the first launch.

Archive of Cemu Releases

You can copy the download link from Cemu's download page, paste into your URL bar, and edit the version number to point to the version you wish to download.

  • Choosing of a/b/c/d+ versions not available for download while using this method.

Updating Games & adding DLC

Easy Mode

[File > Install game update or DLC]

With the Update and/or DLC in decrypted/unpacked RPX format (Loadiine Format / 3 separate folders,) use this option and navigate to the Meta folder.

Open the Meta.xml either the Update and CEMU will move the files where they need to be. Repeat the method to do the same for DLC.

Manual Mode

Adding updates to the right directory - Click Here

Adding the DLC to the right directory - Click Here

ShaderCache

Transferable shaders are dumped Wii U shaders + some render state info. It's the raw input needed for shader translation and can be transferred across different computers to different Cemu installations.

Download links are prohibited.

Transferable ShaderCache becomes Precompiled ShaderCache once you load the game. Precompiled shadercache is an extra cache layer to speed up shader cache loading. Each time you encounter a new effect or piece of environment in a game you will freeze temporarily and it will save those shaders into your Precompiled and Transferable Cache. You should not freeze again after encountering that shader.

Transferable ShaderCaches are stored as .bin filesin \Cemu\shaderCache\transferable while Precompiled Shadercaches are stored in \Cemu\shaderCache\precompiled. These files are named to match the RPX hash of a title and is displayed in Cemu's titlebar when a game is loaded. Conventional shaders have an additional _J suffix

-

Is there any benefit to building your own?

You will be able to ensure there is not any duplicate cache data from Breath of the Wild (if you make your own,) as the Game Update from 1.3.1 to 1.4.0 invalidated caches; (Transferrable Cache that was made collectively with both -/1.3.1 and 1.4.0/+, together, will contain duplicates that will not be detected by Cemu or Nosklo's tool, effectively bloating your RAM). Non-bloated cache for Breath of the wild should be roughly 9650 shaders. All other known games should be fine and should not experience this problem.

The majority of caches you can find online will be accompanied by errors you won't be able to fix without Nosklo's Shader Utilities tool; Download - You can find the corrupt shaders when viewing your log.txt within Cemu's folder after loading the game in the emulator, reaching the title screen. "Open" and then "Unpack" the Transferrable Cache with the tool, remove the shaders named in log.txt, then select "Open" again within the tool and repack the cache by selecting all of the singular extracted shaders at the same time. Replace your older cache that was corrupt. Test the cache again by loading the game and checking log.txt once more.

Additionally, it's likely you will have to rename the cache to match the name your game requires, as when people merge Games + Updates together, it changes the Cache ID. The required ID can be found in log.txt and/or in Cemu's window title bar after the game has been loaded.

Note 1: Older Transferable ShaderCaches from pre-1.8.0 will not work with newer Cemu versions.
Note 2: (Not Recommended!) As of Cemu 1.11.6 Conventional Shaders from pre-1.8.0 have been reintroduced, and can be enabled by disabling Use separable shaders Options > General Options.

Cemuhook

[ Click here to return to CEMU's Recommended Settings ] (Top)

Download Cemuhook by Rajkosto from: https://sshnuke.net/cemuhook/

Extract ALL contents of the Cemuhook ZIP / Archive into your Cemu folder.

When opening Cemu, make sure to download your Shared Fonts.

Open Cemu > Download the Shared Fonts with the link that appears in the main window.

Cemuhooksharedfontsdllink.png

These are REQUIRED for various titles to function correctly, such as Super Smash Bros. Wii U, Mario Tennis: Ultra Smash, and Super Mario Maker

Cemuhook also allows the following:
  • Extended Debug Mode with Extra Options, some required for various games. (QPC Mode)
  • Allows you to set up a Gyro-enabled Device / Controller / Phone to use with Motion Control games.
  • Allows in-game cutscenes to play on various titles instead of crashing or a glitchy green-screen.
  • Lets you play games in fast-forward or slow-motion mode under Debug.

Motion Controls

Motion Controls with Cemuhook using DS3 / DS4 / Android Phone, by Rajkosto: Click Here
Motion Controls with Wiimotes, using WiimoteHook, by Epigramx: Click Here
Switch Pro Controller and Joycon Motion Support using BetterJoyForCemu, by Davidobot: Click Here
Motion Controls with Steam Controller: Click Here
Motion Controls with Windows Phones & Tablets, UWP MotionSource App: Click Here
Motion Controls with iOS devices (iPhones, iPads, etc) MotionSource App: Click Here
Motion Controls with iOS devices (iPhones, iPads, etc) No App Installation Requirement: Click Here

Graphic Packs

Grab your packs from here, make sure to unzip the archive after downloading. Place them into your graphicPacks folder.
DELETE YOUR OLD PACKS FIRST

GraphicPacks Download: Click Here

DELETE YOUR OLD PACKS FIRST
Keep in mind the higher resolution you go, the more likely you will lose FPS.

[BotW] Graphic Pack Descriptions

Average Users - GPU Fix Packs + AA Enabled, 1440p Resolution, Shadows @ Medium, LWZX, Clarity + my preset (Serfrost), and Dynamic FPS++ (or) Static FPS

CEMU 1.14.0 Graphic Packs

Graphics:
  • Anti-Aliasing
Select an Anti-Aliasing mode which helps eliminate the stair-stepping effect in order to obtain smoother textures & models.
You can click "Reload Shaders" button at the bottom to see the difference in-game.
  • Resolution
The best but heaviest form of Anti-Aliasing. Allows you to select a resolution preset on the right-hand drop-down menu.
Lower = Blockier. Higher = Smoother, but harder on GPU.
  • Shadow Resolution
Allows you to select a shadow resolution preset on the right-hand drop-down menu.
Lower = Blockier. Higher = Smoother, but harder on GPU.


Modifications:
  • Monochromia (Incompatible with Clarity)
(Currently Unstable) This is one you would want to try for yourself. Think of lots of grey but with a splash of color that fades in as you get closer.
  • Cheats
You can edit this pack in its folder to enable a set of cheats for the game.
  • Divine Laser Beams Customizer
Allows you to disable or change the color of the Red Beams that emit from defeated Divine Beasts.
You can click "Reload Shaders" button at the bottom to see the difference in-game.
  • Dynamic FPS++ (Xalphenos)
Allows users to dynamically reach the peak FPS their system can handle.
  • Glow Lights Colors
Requires manual editing of the graphic pack. Allows changing the light source color on various Sheikah objects.
  • Static FPS (Epigramx)
See the specific section in this guide for an explanation. [Recommended Read]


Enhancements:
  • No Depth of Field
Removes the blur effect when you focus an enemy during battles as well as when using the camera rune.
  • Clarity
Allows you to select a [Color+Tonemap+Brightness+Contrast] preset from the right-hand drop-down menu.
You can click "Reload Shaders" button at the bottom to see the difference in-game.
  • Enhanced Reflections
Increases the ability of Shrine walls & objects to reflect light or mirror objects. May cause a performance hit.


Workaround:
  • AMD Shadows
A necessary fix for almost all AMD GPUs and Intel iGPUs. AMD GPUs on Linux should not require this. (See the Extra section of the guide.)
  • Kakariko Torch Shadows
Fixes the square lighting around torches in the village.
  • LWZX Crash Workaround
Not necessary if you use General Settings > Full sync at GX2DrawDone(); otherwise it will prevent certain crashes.
  • NVIDIA Explosion Smoke
Before, smoke effects would be rotated incorrectly and flat. This fixes that.

NVIDIA GPU Settings

[ Click here to return to CEMU's Recommended Settings ] (Top)

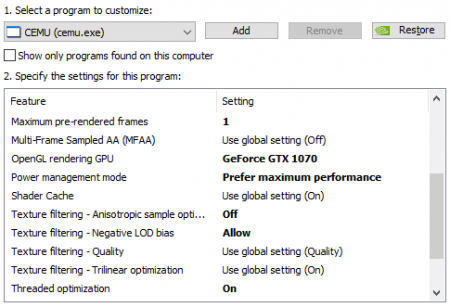
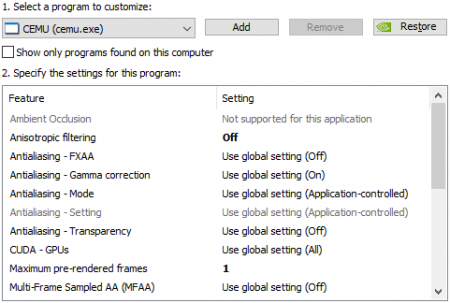
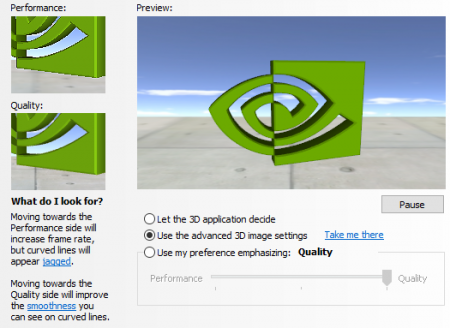
Recommended Nvidia Control Panel settings -

Nvctrlpanel1.png Nvctrlpanel2.png Nvctrlpanel3.png

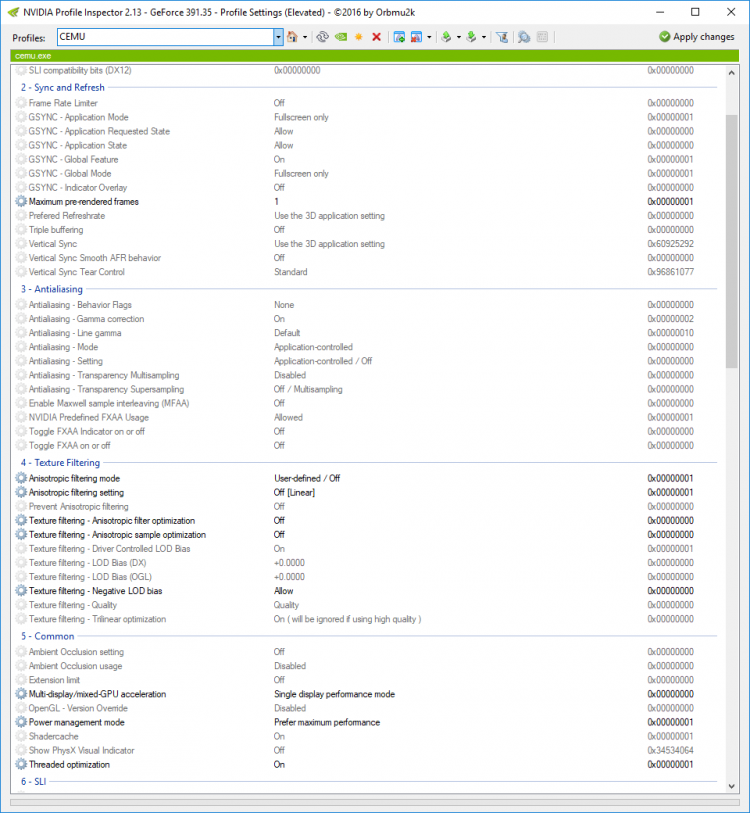
Alternatively for more options, download Nvidia Profile Inspector -https://ci.appveyor.com/project/Orbmu2k/nvidiaprofileinspector/build/artifacts

Open Nvidia Profile Inspector and create a new Profile for CEMU. Attach the CEMU .exe to the profile.

Make your changes and Apply. Cemu must be restarted before changes can take effect.

Nvprofileinspector.png

Credit to xElite_V/Carl for provided images.

[ Click here to return to CEMU's Recommended Settings ] (Top)

AMD GPU Settings

Extra

Laptops with Dual Graphic Cards

Ensure your laptop is using your desired GPU for Cemu, otherwise you will likely be using Intel Integrated Graphics (iGPU)

Nvidia Users: Open Nvidia Control Panel > Manage 3D Settings > Program Settings > Set the preferred GPU for CEMU.exe

AMD Users: If you know how to change this setting for AMD users, please shoot me a message on Discord so I can add it here. Serfrost#7643

AMD Users + Linux (Better Performance)

AMD's lack of performance is due to their deprecated Windows OpenGL support since moving their attention to the Vulkan API. Had AMD added additional compatibility extensions it would not have the problems it does, and to be fair, it's mainly Breath of the Wild that is effected. Will AMD ever improve their OpenGL driver support?--We don't know. Probably not.

In the meantime, Linux users can use MESA drivers for AMD which aren't applicable to Windows systems, seeing anywhere between a 25~50% performance increase in contrast.

Courtesy of Discord user Johngalt#5368 -

https://github.com/CEMULinux/cemutil
It's pretty much streamline from there.
Linux: Currently, Cemu 1.14.0 breaks compatibility with New Super Mario Bros. U on AMD Vega 8 GPUs
Further support for Linux related questions can all be discussed within our Official Discord in the #Linux channel.

Vulkan Support?

Cemu's Vulkan support is estimated to begin between Q1 to Q3 of 2019
Further information regarding Vulkan can be found by searching Cemu's Discord: Search from: Exzap#0700 has: vulkan

Gamecube Controller Support?

The Mayflash Adapter is natively supported; and though not natively supported, the Official Adapter can be used via: Here

Exzap and Petergov plan to add native support for the Official Wii U Gamecube Adapter at some point.

Windows PC Optimizations

Windows 10 Users:
Open Msconfig ( Win Key + R > Type " msconfig.exe " > Press Enter > Navigate to " Services " )

Disable the Following:

  Xbox Accessory Management Service
  Xbox Live Auth Manager
  Xbox Live Game Save
  Xbox Live Networking Service
Apply changes & restart your PC.

These services are unnecessary for Cemu and you can see a rough 1~5 FPS increase. For games you want to use them with, make sure to enable the services again.

Additionally, make sure all background programs that are running are closed before running CEMU. Simply having Discord, Firefox, or Google Chrome open can decrease your performance.

I recommend the following:

  • Process Explorer: Click Here (A more powerful Task Manager)
Disable OSD Monitoring Programs (On-Screen Displays):
Using OSDs may cause FPS drops while using CEMU. Make sure they're disabled. This includes Nvidia's overlays, Win10 Xbox Game Bar, Steam Overlay, and other types of rendering software.
Playing BotW? Only have 8GB of RAM? Try this:
Within CEMU, right-click your game and go to its GameProfile

Under [Graphics], edit the Line:

accurateShaderMul = true changing "true" to "min"

Note: This may disable some textures, however it can save quite a bit of RAM.
( i.e. Going from 12GB free required to 8GB free required. )

Go to your *\shaderCache\Precompiled\ folder and delete the cache for the game.
(Seen in log.txt after running the most recent game in question.)

I recommend clearing the GLCache in %localappdata% \ Nvidia|AMD \ GLCache

Win Key + R --> %localappdata%

GPU Driver Updates & Downgrades, Corruption?

Each time after updating or downgrading your GPU Driver, you will need to delete your Precompiled shaderCache.

I recommend clearing the GLCache in %localappdata% \ Nvidia|AMD \ GLCache

Win Key + R --> %localappdata%

Always make sure to be using the newest, or otherwise, most stable GPU Driver to date. If you have some issues, make sure it isn't your driver.

If you think your driver is corrupted or your driver isn't behaving as expected, you can use DDU to uninstall your drivers in Safe Mode. Restart your computer. Reinstall your driver of choice afterwards.

Display Driver Uninstaller Download

Note: If reinstalling your driver does not fix the issue, make sure to view the other bugs mentioned below. Ask on the Cemu Discord if any other users are having problems after changing GPU Drivers.

[BotW] Xalphenos's FPS++

Now included in the Graphic Packs included from [The Github Website] [Appveyor Link]

Supports BotW v1.4.0, v1.4.1, v1.5.0
Cemuhook required.
Make sure to disable any FPS limiters or vsyncs that force 30FPS unless you only want 30FPS.

If you only want 30FPS, I recommend Epigramx's Static 30FPS Mod for FPS++ instead (Higher stablility.)

If you experience slow-motion, please switch to standard FPS++

Simply drag and drop the extracted file from the ZIP to your graphicPacks folder.

Open CEMU > Options > Graphic Packs > Enable "The Legend of Zelda Breath of the Wild - FPS++"

[BotW] Epigramx's Static FPS++ Mods

Supports BotW v1.4.0, v1.4.1, v1.5.0
Cemuhook required.
Make sure to disable any FPS limiters or vsyncs as this uses its own FPS limit and vsync variable.

Link's shaky animation and laggy camera movement, (in short, due to frame-pacing), is from the "Dynamic FPS Mod", FPS++, from Xalphenos. The dynamic feature was put in place for those who cannot maintain stable framerates.
It allows the game to play in full speed even if you can't maintain your FPS, as most people cannot with mid or lower-end hardware.

Epigramx has since simplified FPS++, dropping the dynamic feature in order to be more reliable with different permanent FPS limits, you can fix the frame-pacing so long as you don't, at any time, go below that FPS limit you set by using one of his packs; if you can't maintain a steady maximum, you'll go in slow motion.

If you set one of these up and go below the FPS required you will have the game slowed down and not at normal speed, this is why Xalphenos mandated FPS++ be dynamic so that it can change freely; that said, if you continue to use FPS++ you will experience that juddery/shaky animation type. This is normal and happens with everyone.

For example, if you never drop below 40FPS, including in towns or in battle, you can make use of Epigramx's 40FPS lock. This will remove the shaky / stuttering animations of Link and the camera. However, if you cannot maintain even 30FPS, you should just use Xalphenos's FPS++ and deal with the shaky Link animations, in my opinion.
FPS Mods Info Slow motion? Allows 60+ FPS? Physics fixed over 30FPS?
Xalphenos's FPS++ Allows varying FPS but with pacing issues. Will not happen. Yes Not yet.
Epigramx's Static FPS Limits FPS and balances pacing. Yes, if you go below your specified FPS. Yes, with the right version or your edited one. Yes, for the most part.

So the decision is yours.

[BotW] GX2DrawDone() for Accurate Emulation

Located at: Options > General Options

This option is recommended to help avoid potential CPU<->GPU desync issues and accurately emulate the CPU<->GPU sync behavior that most games expect.

Keep in mind that the higher the resolution you use in-game, the more of a performance hit you will take.

Issues it fixes include but are not limited to:
  • Stuttery NPCs at a distance, including enemies and wildlife.
  • The Camera Rune being unable to detect objects for photos.
  • Possible rune-related crashes.
  • Fixes Rain / Wet Surface Detection
  • Constant Blood Moons at the wrong periods of time. (aka Blood Moon spam)

[BotW] Graphic Bugs, Glitches & Problems

Slashiee's Compilation of Bugs & Fixes

First of all, if you're experiencing any weird anomalies with graphics, check out Slashiee's FAQ - [Click Here]

[BotW] Other Graphic Problems:

If you encounter any strange artifacts or issues that don't disappear with a restart of Cemu, you can try deleting your Precompiled cache and rebuilding it. If it's still in error, it may be your Transferable shaderCache; delete it for the specific game and then you may try building your own--if that's too much of a hassle, you can find one online but you may end up with the same problem; we do not provide links as this is considered a form of piracy! If still persistent, that's when you would want to try getting assistance or trying the GPU Driver Re-installation fix located in the section above.

Other Glitches:

Slate Runes cause the game to crash.
Enable Options > General Options > Full Sync at GX2DrawDone()
Enemies/NPCs are stuttering & freeze when I'm not near them.
Enable Options > General Options > Full Sync at GX2DrawDone()
The Camera Rune doesn't recognize items and other objects.
Enable Options > General Options > Full Sync at GX2DrawDone()

Bugs and glitches should be reported on our Discord!

For quick and reliable support, feel welcome to come by the Discord. https://discord.gg/5psYsup

MAKE SURE TO READ THE RULES IN #WELCOME -- PIRACY IS NOT SUPPORTED

Message me on Discord if you have any questions regarding the Guide. Thank you.

Donate?


Appreciate this guide? Consider donating, as I don't have an income; anything would mean a lot!
=== PayPal Donation Page ===